In just about every single store that you go into there are end caps of some form or fashion. As a manager this is one of the single largest and easiest areas of the store that you can utilize to improve appearance and to drive sales. Don’t forget that anytime you change out an end cap you need to clean down all of the fixtures while they are empty.
end cap Gondola
GondolaThis is the end cap, the section of shelving on the end of a gondola or the regular aisle shelves. There are many options to end cap building and in some cases you will have no say. Some retailers give their managers control of the merchandising here and others detail out where every single piece of merchandise goes. A few pointers: Traditionally end caps have been single price point single item fixtures used to promote one SKU. More and more retailers are moving away from that, most retailers expect you to cross merchandise atleast one SKU witht the primary item, If you choose to put more than one item on an end the other items should be the same price, catagory, line, or price point.The following are some merchandising choices/do’s/don’ts and etc.


What you see above is the basic garden variety end cap, the one I Love. . Almost. Single item, single price. Nice blocked look and well signed (By signing I don’t mean logos, labels etc . I am talking about the sign that tells the customer how much it is.) however, I would have raised the bottom shelf and inserted a fourth level of product on the base deck , put three layers of product on the bottom shelf and then with a tight (1/2” -1” gap) inserted the second shelf. On the top shelf would go two layers of product and then you would probably be very close to the top of the end cap back (See how the merchandise is lower than the back?) What is the down side to this? You have a relatively large item if you don’t have a lot of product then the end cap will quickly start to look gap toothed and will have to be changed quickly. The Clip strip hanging in the middle and signed is a good idea, so long as the item on it is a direct add-on sale. (For a DVD player you are going to be looking at Disc cleaning cloths, maybe an extension cord, micro fiber cloths for screen cleaning, or universal remotes) With a “Side kick” of Duracell batteries hanging off the side I would stay away from batteries. If you are not careful with cross merchandising it will no longer make sense and start to look like a garage sale. To build this you would place one stack of merchandise on the base deck four high and use that as your spacer. Watch the angle on the shelf in the back, if you just flop in there you can damage what looks to be DVD players. (You want to sell them not shrink them!) Make sure you only have ½” -1” gap between the merchandise and the shelf and then place a stack of three on the new shelf. Once you have made sure that the level of the merchandise is close to the level of the back of the end cap then you can fill the end with more products. It is a question of preference as to whether or not to leave the gap in the middle or to center the merchandise leaving a smaller gap on the outsides. To me I would leave it as it is in the interest of safety, people are less likely to hit the edge of the shelf if there is merchandise out to the edge.
(Note the Printers on the floor! We will talk later about recovery standards!)

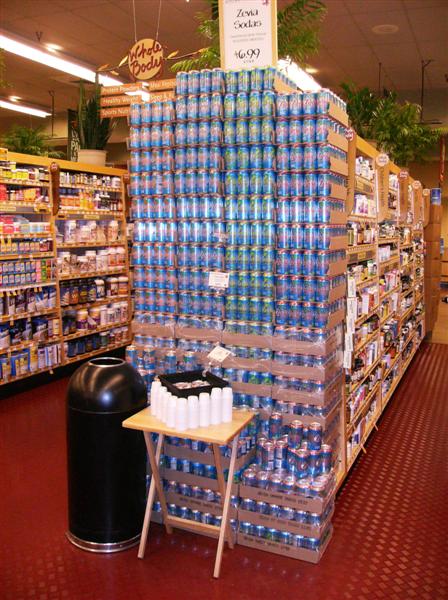
At first glance this one is just looks just AWESOME! However, look at the way it is built, with the exception of the few cases on the bottom in the front, you cannot reach any product unless you are Shaquille O’Neal. There are no shelves! Further they have placed that sample table and trash can right in front and if you are standing right in front of the product I’ll bet the price at the top is out of your line of sight. Essentially there are three and a half cases that can be shopped. Since they are offering free samples it probably tastes good and those three cases are gone in minutes. Then what? People walk off mad because you made an end cap that is little more than warehousing! The answer here would be to probably add shelves at a decent level maybe every two or three cases vertical and slide the table to the side of the end cap like a wing stack with the trash can beside it. Further I would try to get a sign at eye level. I would also put a sign on the table if there was no associate there to encourage people to try it. With a food product though, I would have someone monitor it. Both for portion control (3 more cases and I’ll know if I like it!!) and food safety (Who knows what could go in those already opened cans.)

More and more retailers have vendor provided end caps; this one is a very nice example with signage, and sloped shelves that allow the product to automatically fill in. These are nice looking and easy to maintain. Notice the wing stack placement, if there is only one facing of product on the shelf then the customer is not seeing it. If you are hiding merchandise with your wing stacks then you are not merchandising you are warehousing.


It is probably a philosophical point, but I despise these kinds of end caps. In an effort to force more and more SKU’s in front of customers, retailers are starting to move toward this style of end cap that at my estimate/count houses about 40 SKUs! Not bringing up the clip strip in the middle of the side kick or the edge on green boxes on top stock, this is total garbage. Where is the statement? What is the theme? What is the price point? This looks like another four foot section out of the gift aisle. Next to it on the left you can see what appears to be about a half dozen home décor SKU’s. This is the type of end cap that spawned the idea for the monstrosity you see in this picture. When you have a single item, brand, price point packaging scheme etc, sure cross merchandise and rack up sales. This style of 40 random SKU’s doesn’t speak to me. It probably won’t speak to customers either. Remember end caps are not permanent and as such should be promotional; the man hours involved in creating, maintaining and switching this beast is probably incredible. That being said, often these end caps are created at the home office and mandatory. If that is the case you smile, say yes sir/ Ma’am, build it and drive on. Given an empty end cap in my store this would be a last resort for example only if I didn’t have the goods for any other option. By the way, I found more pictures and a how to set on this end so it was actually plan-o-grammed!


DUDE! WHERE IS MY MERCHANDISE? What a waste of primo real estate! This is a cardinal sin in retailing, never have empty end caps. Looks like the vacuums over the left shoulder of the centered end cap have the same problem I was talking about with too large an item on an end cap, you sell one and you have a great big hole!

Come on man, it’s just a section of the aisle! Yeah it is all BBQ sauce, it is outstandingly presented, filled and fronted ,but the only staement it is making is we got a lot of BBQ sauce! It’s just an extension of the condiment aisle.


When you have to put different merchandise on an end cap there are a couple of different ways, the method above is “striping” or ”ribboning” . This is where you vertically stripe the merchandise so that everything that is the same SKU is vertically striped up and down. This presentation is good where you have customers who are walking along and not scanning up and down. With their eye level at one level they are guaranteed to see every SKU on that end.


When you are using shelving you start building at the bottom, but when you are building an end cap with peg merchandise you begin at the top. By starting at the top you can present a level edge at the top of the end cap. After putting the first peg on, put a single piece of merchandise in place to use as spacing. At this point put in your top row across the top. It looks best if they are all the same length and width, but that really doesn’t matter, the important part is that you have enough merchandise to fill each vertical stripe on the end. (If you know basically how many pieces will fit on a peg and how many pegs will fit vertically in that space you can do the math and figure out how many you need.) Space your columns about one inch or one pegboard hole apart to allow for merchandise to be shopped without pulling it all in the floor. Work your way across the top with one peg and one piece of merchandise until you have filled the top row. At this point look at the end. Is the merchandise centered or are there big empty stripes on each end or is merchandise hanging way out in the aisle? Adjust the row and spacing until there are no gaping holes and there is no overhang. You may have to substitute different items so that it looks good. When substitute make sure that you are staying in price point and/or category. If you are striping Christmas ornaments, don’t go and stripe a row of crescent wrenches! Allowing for about an inch or one peg hole of space between each presentation of merchandise proceed to the bottom. As you go down each stripe leave one space for spacing and making sure you are putting in the same item as above. The bottom peg should leave enough room so that it does not touch any other merchandise there. Some retailers I have worked at have insisted on nothing on the base deck on peg sections, others have said no empty base decks because they are a safety hazard. Whatever, if your retailer wants stuff there, then leave enough room that your peg merchandise is not “in” it. Once you are done with your first vertical continue down the end until the whole thing is full.
In this case you are looking at blocking or horizontal striping. Much the same as the vertical except the merchandise stays the same in horizontal rows instead of vertical columns. Build your way across each row with one piece of merchandise per peg and then center it, move down and start your next row. Center each row and make sure that there is not too much or too little space between and on the edges. This method works really well when you have shelved items on the bottom say and angle grinder, then you can peg an accessory like grinding wheels across the top. Notice also the way I arranged the items with smaller on top and larger on the bottom, this makes all items equally likely to be seen. If smaller items are on the bottom and they sell down they can be hidden from view by the large items on the top and decrease your sales for that fixture. Once you have all of it laid out go back and fill ‘er up.
Hello,
ReplyDeleteNice Post..:-)
Thanks for sharing your this post and keep posting such post here in future too. it would be nice if you can share some information related to snap frames here in your future posts..
Thanks,
Hello,
ReplyDeleteGreat post! Thanks for sharing such a awesome information.I must say very good job.
Hotels in Mohali
All good points however regardless of whether you are using shelves or pegs you ALWAYS work from bottom to top.
ReplyDeleteAll good points however regardless of whether you are using shelves or pegs you ALWAYS work from bottom to top.
ReplyDeleteI really appreciate your wonderful collection! Do you find here any similarities with this Shelving Racks
ReplyDeleteExcellent post. Security Blog Melbourne gives complete end-to-end advancement and foundation benefits through totally approved specialists and experienced program and improvement heads.
ReplyDeleteFor the small-business owner in the retail sector, there are plenty of options when it comes to store displays. But, it is important to pick the right display to fully showcase the different items of merchandise. I am really happy with the gondola rack service and I highly recommend this rack. You can see more here about the super shop display gondola.
ReplyDeleteHey I’m Martin Reed,if you are ready to get a loan contact.Mr Benjamin via email: lfdsloans@lemeridianfds.com,WhatsApp:+1 989-394-3740 I’m giving credit to Le_Meridian Funding Service .They grant me the sum 2,000,000.00 Euro. within 5 working days. Le_Meridian Funding Service is a group investors into pure loan and debt financing at the returns of 1.9% to pay off your bills or buy a home Or Increase your Business. please I advise everyone out there who are in need of loan and can be reliable, trusted and capable of repaying back at the due time of funds.
ReplyDeleteRetail digital shelf screens are digital displays placed on retail shelves to capture shoppers' attention and influence their purchasing decisions. These screens can provide product information, promotions, and even personalized recommendations. They offer a new way to engage with customers and create a dynamic shopping experience that can drive sales and increase brand loyalty.
ReplyDeleteAbsolutely! End caps play a crucial role in the overall shopping experience. It's impressive how a well-managed end cap not only enhances the store's aesthetic but also has a significant impact on sales. As a manager, leveraging this prime real estate is a strategic move that can't be overlooked. End cap display
ReplyDelete